There really isn’t anything like some frothy milk to add an extra level of opulence to your favorite coffee drink. Its velvety texture is what makes a cappuccino so elegant, and what makes a latte feel so luxurious. For many, those qualities can only be enjoyed at the local café, but the truth is, it’s very easy to make a frothy topping for your cappuccino yourself, allowing you to enjoy that luxurious feeling in the comfort of your own home. Bonus luxury points if you can convince your significant other to make it for you!
While there is an ever-increasing variety of milk frothers available in the market ranging from hand-pump models to battery operated and electrical models; in the end, they all perform one basic function. They rapidly introduce air into milk by agitating it, which in turn creates the bubbles and increases its volume. The frother is a small enough devise that can be easily stored; hence storage is not an issue here. It is also common for cappuccino makers to have a built in frother. Such frothers use steam for frothing the milk and they make a distinctive fizzing sound commonly linked with cappuccinos and coffee bars.
With the continuing rise in the variety of espresso based drinks with their foamy toppings like macchiato or cappuccinos, more people want to try creating these drinks themselves. The milk frother is can be an invaluable tool for creating such drinks.
- Hand Pump Milk Frother: looks like a plunger hooked to a fine mesh screen that is encased in a stainless steel cup. Very economical and easy to use, these types of frothers require plenty of effort to actually produce sufficient foam for a cup of coffee. They are only practical if you make no more than a couple of cups of coffee at a time.
- Motorized Models: Hand held units that are similar to hand pumps but a bit more costly. They usually have either a small whisk or a propeller attachment that hooks to the milk frother which froths milk by spinning rapidly. These versions are better suited for making larger quantities of froth faster, however if caution is not exercised, they may chip porcelain cups.
- Electric Frothers: Also fairly small in size they kind of resemble a miniature food processor. Since these types of frothers are capable of frothing larger quantity of milk they are ideally suited for someone making multiple cappuccinos in one go. It gets the job done fast and some models are even capable of heating milk while frothing. They tend to be more costly compared to others.
Micro foam & Frothed Milk
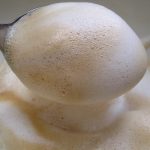
Being able to produce good quality micro-foam requires some practice. Initially you may end up with milk that has big soap like bubbles or the other extreme something stiff like a meringue! What you want to create is really thick milk with uniform foam. Its texture should be such that it pours out like a sauce and has rich, sweet taste. Foam of this quality is known as micro-foam, implying that the foam actually becomes a part of the milk and not just soapy layer on top.
Best Milk for Frothing
A common misconception is that the fat content of milk determines the quality of froth. In reality it is the protein in the milk. A second factor that is vital to creating good foam is the temperature of the milk. The best foam is made when milk at approximately 95°F is used. At higher temperatures proteins in the milk begin to degenerate and release sugars. This impacts the quality of foam negatively not to mention change the flavor of the milk significantly and ultimately the coffee itself.
For lactose intolerant individuals there is good news, alternatives nearly matching texture, taste and ability to mix like milk are available. These include almond milk, soy milk and milk from goat. While skim and low fat cow’s milk are best for foaming, they do lack the creamer texture of whole milk. It is not a bad idea to try different option and see which one suits your personal preference.
Frothing Milk – Tips & Tricks
Correctly frothing milk can be accomplished in a few simple steps described below:
1 – Positioning the Tip: The milk in your cup of frothing pitcher can be divided into three sectors and each sector is recognized by the sound the frother makes. In the first zone, nearest the surface, the frother makes a bubbling sound. Pushed a little deeper the sounds become more like sucking and as the frother is pushed closer to the bottom of the pitcher there is a loud roaring sound.
To make the micor-foam, place the tip close to the top, but you should hear the sucking sound sporadically. While foaming the tip of frother should not go any deeper than this second zone. But you need to be careful, If the tip stays in the “sucking” area for too long the foam may end up being too stiff and not sufficiently micro. So you need to work near the very top of the milk but gently work the tip down into the second area also.
2 – How Long do I Foam?: As the milk foams, its volume will increase. You should stop once the volume has roughly doubled.
How to Use a Pump Milk Frother – Step by Step Instructions
1 – Pick the right Milk: Apparently, skim or 2% milk is the best choice. Something about the extra fat in full fat milk hinders the stability of the bubbles.
2 – Heat Up the Milk: The first step in creating a rich luxurious foam is to heat up the milk. Warm milk is much better at retaining the bubbles. You want milk that is about 95 degree Fahrenheit. A good rule of thumb is you want the milk to be lukewarm when you pick up the container, any more than this and you’ve probably over-heated it.
3 – Add the Milk to the Frother: Add the milk to the pump action frother, making sure not to overfill it. If you do not have a frother, I’ve seen some people get pretty good results using a French Press. Remember that the frothing process will help the milk gain volume, sometimes up to twice as much! To avoid a mess, make sure you’re using an appropriate amount of milk.
4 – Pump it up!: Now you’ll just need some good old elbow grease! Pump the milk consistently for 30 seconds to a minute, the longer the better. This will translate into roughly 50 – 60 pumps in all.
5 – Let it Rest: Let the milk rest for a minute, allowing the liquid milk to settle at the bottom, leaving a thick layer of foam at the top.
How To Use an Electric Frother – Step by Step Instructions
1 – Pick the right Milk: Again, use skim or 2%
2 – Heat Up the Milk: Just like above, heat the milk up to roughly 95 degrees Fahrenheit.
3 – Pick an Appropriate Vessel: I like to use a cocktail shaker or a stainless steel cup, similar to what you’d get with a milkshake maker.
4 – Froth It Up!: Starting with the Frother wand fully inserted in the cup, start the electric frother. As it’s doing its work, move the frother up and down, and in circles, trying your best to aerate the whole thing. Concentrate on frothing the top of the milk, closest to the surface first. Once you have a nice surface layer of foam going you can move the wand deeper in the milk. If you’re missing an electric frother, you could try substituting an emersion blender.
How To Use the Steam Wand on Your Espresso Machine – Step by Step Instructions
1 – Pick the right Milk: Skim or 2%
2 – Heat Up the Milk: Remember, roughly 95 degrees Fahrenheit.
3 – Pick an Appropriate Vessel: Typically, your espresso machine will come with pitcher custom made for this purpose. Otherwise, make sure to pick something tall enough to fit the whole length of the steaming wand, as well as made out of a material that can withstand the heat. If the vessel doesn’t have a handel, remember to use a rag or oven mitt to prevent burns.
4 – Purge the system: Grab an empty cup and hold it below the steam wand. Turn the knob to allow the water / steam to start coming out. Catch any excess water in the cup and dump it out. You can stop once you see mostly steam being released.
5 – Froth It Up!: Starting with the steam wand fully inserted in the cup, start the steamer. As with the frother, you’ll want to start with creating a thick surface layer of foam. Once that’s done, move the cup up, down, and around to aerate the entire container of milk.
6 – Wipe off the wand: Trust me, it’s much easier to just get it out of the way now.
How To Froth Milk With No Frother – Step by Step Instructions
This is actually a lot easier than it seems, and a great alternative for those who don’t want the extra clutter of a frother lying around.
1 – Pick the right Milk: Still skim milk or 2 percent.
2 – Put it in a mason jar: Make sure to only fill it up halfway at most as you want to leave room for the milk foam to expand. If you don’t have a mason jar, any microwave safe container with a tight lid will do.
3 – Shake it!: With the lid on, vigorously shake the milk for as long as you can, at least 30-second to a minute. This will cause it to foam up.
4 – Microwave it: With the lid off, put the mason jar in the microwave and heat it up for about 30 seconds to 1 minute; until steam begins to rise up out of the mason jar. On top of heating it up, this will help the foam stabilize as it rises to the top of the milk.